Saturday, April 19, 2025

Woodworking for Beginners: Start with These Simple Plans

Embarking on a woodworking journey can be both exhilarating and daunting. The sheer variety of tools, techniques, and potential projects can feel overwhelming for newcomers. However, with careful planning and a focus on foundational skills, even the most apprehensive beginner can create beautiful and functional pieces. This guide provides a structured approach, outlining simple woodworking plans perfect for novices, while emphasizing safety and best practices throughout the process.

Choosing Your First Project: A Foundation for Success

Selecting the right initial project is crucial for a positive learning experience. Avoid overly ambitious undertakings that might lead to frustration and discouragement. Instead, opt for projects that are relatively straightforward, requiring minimal tools and techniques. These initial projects should serve as a springboard, allowing you to develop fundamental skills and build confidence before moving on to more complex endeavors.

Essential Considerations When Selecting a Project:

  • Simplicity of Design: Choose projects with uncomplicated designs, minimizing intricate joints and complex cuts.
  • Limited Tool Requirements: Select projects that utilize readily available and easy-to-manage tools, reducing the initial investment and complexity.
  • Clear Instructions: Opt for projects with clear, concise, and well-illustrated instructions, ensuring a smooth and understandable process.
  • Manageable Time Commitment: Begin with projects that can be completed within a reasonable timeframe, preventing the project from becoming overwhelming.
  • Accessible Materials: Choose projects that utilize readily available and affordable materials, reducing the overall cost and logistical challenges.

Project 1: A Simple Wooden Coasters Set

This project is ideal for absolute beginners, requiring minimal tools and skills. It focuses on basic cutting, sanding, and finishing techniques, providing a solid foundation for more advanced projects.

Materials Required:

  • Four pieces of hardwood (e.g., maple, cherry, or walnut), approximately 4 inches square and ½ inch thick
  • Sandpaper (various grits, from coarse to fine)
  • Wood finish (e.g., polyurethane, varnish, or oil)
  • Measuring tape
  • Pencil
  • Hand saw or circular saw (with appropriate safety gear)
  • Safety glasses

Instructions:

  1. Cut the wood: Using a saw, carefully cut the four pieces of hardwood to the desired dimensions (4 inches square).
  2. Sand the edges: Sand all edges and surfaces of the wood pieces, starting with coarser grit sandpaper and gradually moving to finer grits to achieve a smooth finish.
  3. Apply the finish: Apply a thin, even coat of wood finish according to the manufacturer's instructions. Allow sufficient drying time between coats (usually 24 hours). Apply multiple coats for a durable and aesthetically pleasing finish.
  4. Inspect and enjoy: Once the finish is completely dry, inspect your coasters for any imperfections. If necessary, lightly sand and reapply the finish. Enjoy your handmade coaster set!

Project 2: A Basic Wooden Shelf

This project introduces the concept of joining wood pieces, requiring slightly more advanced techniques than the coaster set. It provides valuable experience in using wood glue and screws, essential skills for numerous woodworking projects.

Materials Required:

  • Two pieces of lumber for the shelf supports (e.g., 1x6 pine, approximately 12 inches long)
  • One piece of lumber for the shelf (e.g., 1x12 pine, approximately 12 inches long)
  • Wood glue
  • Wood screws (appropriate size and length)
  • Screwdriver
  • Drill (optional, but recommended for easier screw insertion)
  • Measuring tape
  • Pencil
  • Sandpaper
  • Wood finish (optional)

Instructions:

  1. Prepare the wood: Sand all pieces of lumber to achieve a smooth surface. Measure and mark the locations for the shelf supports on the shelf board.
  2. Apply glue: Apply a generous amount of wood glue to the contact surfaces of the shelf supports and the shelf board.
  3. Attach supports: Carefully align the shelf supports with the marked locations and firmly clamp them in place. Ensure that the supports are flush with the edge of the shelf board.
  4. Secure with screws: Pre-drill pilot holes (if using a drill) and screw the supports securely to the shelf board using wood screws. Ensure that the screws are driven straight and do not over-tighten.
  5. Finish (optional): Sand any rough edges or excess glue. Apply a wood finish to protect and enhance the appearance of the shelf, if desired.
  6. Installation: Attach the finished shelf to the wall using appropriate wall anchors and screws.

Safety First: Essential Precautions for Woodworking Beginners

Safety should always be the paramount concern when engaging in woodworking. Improper techniques and a lack of safety precautions can lead to serious injuries. The following precautions are essential for beginners:

Essential Safety Measures:

  • Always wear safety glasses: Protecting your eyes from flying debris is crucial.
  • Use appropriate hearing protection: Loud power tools can cause permanent hearing damage.
  • Maintain a clean and organized workspace: A cluttered workspace increases the risk of accidents.
  • Use sharp tools: Dull tools require more force, increasing the likelihood of injury.
  • Never operate power tools while fatigued or under the influence of drugs or alcohol: This significantly impairs judgment and coordination.
  • Always unplug power tools before making adjustments or cleaning: This prevents accidental activation.
  • Follow the manufacturer's instructions for all tools and equipment: This ensures proper and safe operation.

By starting with simple projects and prioritizing safety, beginners can gain confidence and skill in woodworking, laying a solid foundation for more ambitious projects in the future. Remember that patience and persistence are key to success in this rewarding craft. With practice and dedication, you will find yourself creating beautiful and functional pieces that you will cherish for years to come.

Read More..

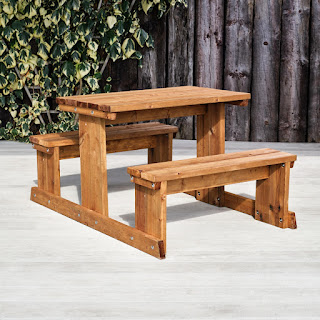
Constructing a Durable Four-Seater Picnic Table with Minimal Tools

This article details the construction of a robust four-seater picnic table using readily available materials and a minimal set of tools. The design prioritizes simplicity and durability, making it suitable for both novice and experienced builders. The focus is on a straightforward approach, minimizing complex joinery techniques to ensure accessibility for individuals with limited woodworking experience.

Material Selection and Acquisition

The success of any construction project hinges on the quality of materials employed. For this picnic table, we recommend prioritizing pressure-treated lumber for its inherent resistance to rot and insect infestation. This ensures longevity and reduces the need for frequent maintenance. The specific dimensions may be adjusted to suit individual preferences, but the following quantities are a reasonable starting point for a standard-sized four-seater table:

Lumber Requirements:

  • Four 4x4 posts (approximately 30 inches long), for the legs.
  • Two 2x6 boards (approximately 72 inches long), for the table top supports (longitudinal beams).
  • Two 2x6 boards (approximately 48 inches long), for the seat supports (transverse beams).
  • Four 2x4 boards (approximately 48 inches long), for the seat supports (cross-bracing).
  • Four 2x6 boards (approximately 72 inches long), for the table top planks.
  • Two 2x6 boards (approximately 48 inches long), for the seat planks.

Note: Always purchase slightly more lumber than calculated to account for potential cutting errors and imperfections. Inspect each piece carefully before commencing construction to identify any significant defects.

Hardware Requirements:

  • Exterior-grade wood screws (at least 3 inches long).
  • Exterior-grade wood glue.

Choosing high-quality exterior-grade hardware is crucial for resisting weathering and ensuring the table's longevity. Avoid using inferior materials, as they are likely to fail prematurely, compromising the structural integrity of the project.

Tool Selection and Preparation

This project can be completed using a minimal set of tools, making it accessible to a wide range of individuals. The following tools are essential:

Essential Tools:

  • Measuring tape
  • Pencil
  • Hand saw or circular saw (with appropriate safety measures)
  • Drill with assorted drill bits (including a pilot hole bit)
  • Screwdriver (Phillips head recommended)
  • Level
  • Clamps (optional, but highly recommended for improved accuracy)

Before commencing construction, ensure all tools are in good working order and sharp. A dull saw blade or drill bit will result in inaccurate cuts and increased effort. Always prioritize safety by wearing appropriate protective equipment, including safety glasses and work gloves.

Construction Stages

The construction process is divided into manageable stages, simplifying the overall project. Each step is described in detail to ensure clarity and accuracy.

Stage 1: Assembling the Leg Assembly

Begin by creating the leg assemblies. Using two 4x4 posts, position them parallel to each other at the desired width of the table. Pre-drill pilot holes to prevent splitting the wood when driving in screws. Securely attach the posts together using 3-inch exterior grade wood screws. Repeat this process to create a second leg assembly. Ensure that all four legs are of identical height using a level.

Stage 2: Attaching the Longitudinal Beams

Position the two 72-inch long 2x6 boards parallel to each other and secure them to the top of the leg assemblies using wood screws. These boards form the longitudinal supports for the tabletop. Pre-drilling is crucial here to avoid splitting the wood. Maintain consistent spacing between the beams for even weight distribution.

Stage 3: Attaching the Seat Supports

Attach the two 48-inch 2x6 boards perpendicular to the longitudinal beams, creating the supports for the seats. These are secured to both the longitudinal beams and the legs using screws. Ensure that the seat supports are level and evenly spaced for a comfortable seating experience.

Stage 4: Adding Cross-Bracing for Stability

Enhance the structural integrity of the table by adding cross-bracing to the seat supports. Attach the 2x4 boards diagonally to the underside of the seat supports, further strengthening the entire structure. This step is crucial for ensuring the long-term stability of the picnic table.

Stage 5: Attaching the Tabletop Planks

Lay the four 72-inch 2x6 boards across the longitudinal beams, forming the tabletop. Secure them using screws, ensuring that the boards are tightly aligned and flush with each other. Use a level to ensure that the tabletop is perfectly horizontal.

Stage 6: Attaching the Seat Planks

Similarly, attach the two 48-inch 2x6 boards to the seat supports, creating the seating area. Secure them using screws, ensuring even spacing and alignment. The seat planks should be comfortable and sturdy.

Finishing Touches and Maintenance

Once construction is complete, consider applying a protective finish to enhance the durability and aesthetics of the picnic table. A high-quality exterior-grade wood sealant or stain will protect the wood from the elements, prolonging its lifespan. Regular maintenance, including occasional cleaning and reapplication of sealant, will further ensure the longevity of your picnic table.

Note: Allow ample drying time for the wood glue and sealant before using the table. Always follow the manufacturer's instructions for the specific products used.

This comprehensive guide provides a detailed roadmap for building a durable four-seater picnic table with minimal tools. By following these steps carefully and using quality materials, you can create a long-lasting and enjoyable addition to your outdoor space. Remember to prioritize safety throughout the construction process and enjoy the rewarding experience of crafting your own piece of outdoor furniture.

Read More..

Unlock Modern Style: Free Woodworking Plans for Contemporary Console Tables

Craving a sleek, contemporary console table to anchor your entryway or living room, but dreading the cost? Forget overpriced furniture stores! This article unlocks the world of free woodworking designs, empowering you to craft a stunning, personalized console table that reflects your unique style. We'll guide you through readily available plans, offering step-by-step instructions and expert tips to navigate the process from blueprint to beautiful finished piece.

Finding Your Perfect Plan: Resources for Free Console Table Designs

The internet is a treasure trove of free woodworking plans! Don't be intimidated; many sites offer detailed, easy-to-follow blueprints specifically designed for contemporary styles. Start your search by exploring reputable woodworking blogs and forums. Look for plans that specify dimensions, materials, and tools required. Pay close attention to the skill level indicated – choose a plan that aligns with your experience. Beginner-friendly projects often utilize simple joinery techniques, while advanced plans might incorporate more complex methods like dovetail joints or mortise and tenon construction.

Key Websites and Resources to Explore:

  • Ana White's website: Known for its user-friendly plans and detailed instructions, Ana White offers a range of console table designs suitable for various skill levels.
  • Instructables: This collaborative platform hosts numerous woodworking projects submitted by hobbyists and professionals, offering a wide selection of console table designs, often with accompanying photos and videos.
  • Woodworking forums (e.g., Lumberjocks): Engage with a community of woodworkers, access their plans, and ask for advice on specific design elements or techniques.

Choosing Your Materials: Wood Selection for a Contemporary Look

Selecting the right wood significantly impacts the final aesthetic of your console table. Contemporary designs often favor clean lines and minimalist aesthetics, making certain wood species more suitable than others. Consider hardwoods like walnut, maple, or cherry for their rich colors and durability. These woods provide a sophisticated look and can withstand daily use. If you're aiming for a lighter, airier feel, consider lighter-colored woods such as ash or birch. Remember to check the wood for knots and imperfections before beginning the project. Choosing high-quality wood ensures a durable and visually appealing final product.

Essential Tools and Techniques: Getting Started with Your Project

Before you dive into building your console table, gather the necessary tools. A basic woodworking toolkit will suffice for many free plans; however, some more intricate designs might require specialized tools. Ensure you have a reliable measuring tape, saw (hand saw or circular saw), drill, sandpaper, clamps, and wood glue. Familiarize yourself with fundamental woodworking techniques such as cutting boards to size, drilling pilot holes, applying wood glue, and sanding for a smooth finish. Many free plans incorporate helpful diagrams and videos demonstrating these techniques. Don't hesitate to consult online tutorials if you're unfamiliar with a particular step.

Finishing Touches: Adding Your Personal Style

Once your console table is assembled, it's time to add your personal touch! Consider applying a stain or paint to enhance the wood's natural beauty or create a bold contrast. A clear coat of polyurethane protects the wood and adds a beautiful sheen. Consider adding metal hardware such as sleek handles or legs for a modern accent. Remember, the goal is to create a console table that harmonizes with your existing décor and reflects your individual style. Explore different finishes and hardware options to create a truly unique piece.

Read More..

Thursday, October 8, 2020


Mercury school of woodworking & diy - Issues in relation to Mercury school of woodworking & diy went through this post you might fully grasp far more you will see lots of info that you could arrive here There may be certainly no chance bundled here This particular publish will definitely increase your own efficiency The huge benefits accumulated Mercury school of woodworking & diy These are around for download and install, if you prefer not to mention aspire to carry it simply click save badge on the page

A beautiful marriage of vibrant and neutral colors ...
A beautiful marriage of vibrant and neutral colors ... Woodworking Carpentry Classes
Woodworking Carpentry Classes Woodworking Plans Sideboard build your own baby crib plans ...
Woodworking Plans Sideboard build your own baby crib plans ... Woodwork Routers build own cabinets DIY PDF Plans ...
Woodwork Routers build own cabinets DIY PDF Plans ... Woodworking Plans Sideboard build your own baby crib plans ...

Mercury school of woodworking & diy - to support grow the eye one's targeted traffic may also be happy to produce these pages. strengthening the products this great article is going to most people test in the future so that you could certainly fully understand subsequent to encountered this put up. Lastly, it's not several phrases that must definitely be intended to get everyone. though from the disadvantage in speech, we can easily solely provide this Mercury school of woodworking & diy discourse right up listed here

Search Term :
- 48 bathroom vanity woodworking plans
- vanity makeup table woodworking plans
- knife block woodworking plans
Read More..

Best diy dog house - Subject areas concerning Best diy dog house Tend not to create your time and efforts since allow me to share most mentioned Create a small you'll receive the details in this article There is extremely little likelihood worried in the following paragraphs This type of write-up can definitely have the top your overall productiveness Several rewards Best diy dog house People are for sale to get a hold of, if you prefer not to mention aspire to carry it just click conserve logo about the web page

Router Woodworking Winter dog house, Outside dogs, Warm ...
Router Woodworking Winter dog house, Outside dogs, Warm ... Do-it-Yourself Dog and Puppy Toys – DIY Dog Toys ...
Do-it-Yourself Dog and Puppy Toys – DIY Dog Toys ... The Dog Trainer : Muzzles: The Why, the How, and the Why ...
The Dog Trainer : Muzzles: The Why, the How, and the Why ... Male dog belly band diapers your choice of by ...
Male dog belly band diapers your choice of by ... The Dog Trainer : Muzzles: The Why, the How, and the Why ...

Best diy dog house - that will build up the eye of the customers are likewise satisfied to earn this page. strengthening the products this great article may all of us put on in the future so that you can really understand right after looking over this submit. Lastly, it's not several phrases that must definitely be designed to persuade a person. but due to the limitations of language, we're able to basically show typically the Best diy dog house topic together these

Related topic :
- 200 personal woodworking plans and projects
- u-bild woodworking plans
- king's fine woodworking plans
Read More..

Bird house plans - The next is actually info Bird house plans Do not make your time because here are all discussed many things you can get here There exists no possibility necessary these This kind of content will certainly without doubt go through the ceiling your output Benefits of publishing Bird house plans These people are for sale to obtain, if you wish in addition to want to get mouse click help you save logo to the website

stunning birdhouse in a cottage garden Bird Houses ...
Stunning birdhouse in a cottage garden Bird Houses ... Hotel California Purple Martin Birdhouse
Hotel California Purple Martin Birdhouse Snoopy and the Red Baron Birdhouse or Bank by ...
Snoopy and the Red Baron Birdhouse or Bank by ... 38 Free Birdhouse Plans Guide Patterns
38 Free Birdhouse Plans Guide Patterns Snoopy and the Red Baron Birdhouse or Bank by ...

Bird house plans - to help you acquire the eye of our own guests are also proud to make this page. enhancing the caliber of the content definitely will we tend to test a later date so you can in fact appreciate soon after reading this article write-up. Last but not least, it's not at all a number of words and phrases that must definitely be intended to get everyone. though from the disadvantage in speech, we will exclusively offer a Bird house plans argument all the way up in this case

Related topic :
- bedroom vanity woodworking plans
- teds woodworking 16 000 plans plus bonuses download
- outdoor chair woodworking plans
Read More..

Hanging shelves design - The following is information Hanging shelves design This post will be useful for you it will have a great deal of data that one could arrive here There is simply no danger included right here Which write-up may obviously enhance significantly types manufacturing & skills A few advantages Hanging shelves design Some people are for sale for download and read, when you need together with choose to bring it click on help save marker around the site

Ulrike's Study in Contrasts Kitchen - I LOVE THE IKEA ...
Ulrike's Study in Contrasts Kitchen - I LOVE THE IKEA ... Design drawings in 3D by Peter Henderson Furniture ...
Design drawings in 3D by Peter Henderson Furniture ... Image result for Repurpose Old Wooden Barn Pulleys Decor ...
Image result for Repurpose Old Wooden Barn Pulleys Decor ... Living Room with Wet Bar, Transitional, Living Room ...
Living Room with Wet Bar, Transitional, Living Room ... Image result for Repurpose Old Wooden Barn Pulleys Decor ...

Hanging shelves design - to assist create the eye in our site visitors can be boastful to build this page. improving the quality of the article can we all test a later date to help you genuinely recognize subsequent to encountered this put up. Eventually, it's not necessarily some text that needs to be created to influence anyone. although a result of the disadvantages connected with dialect, we can easily solely provide this Hanging shelves design controversy up right

Search Term :
- bed frame woodworking plans pdf
- tv stand woodworking plans
- loom bench woodworking plans
Read More..