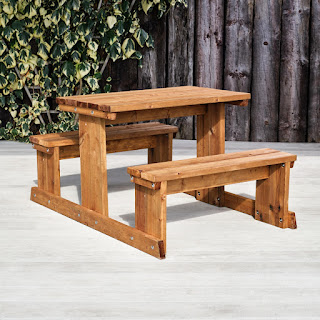
Constructing a Durable Four-Seater Picnic Table with Minimal Tools
This article details the construction of a robust four-seater picnic table using readily available materials and a minimal set of tools. The design prioritizes simplicity and durability, making it suitable for both novice and experienced builders. The focus is on a straightforward approach, minimizing complex joinery techniques to ensure accessibility for individuals with limited woodworking experience.
Material Selection and Acquisition
The success of any construction project hinges on the quality of materials employed. For this picnic table, we recommend prioritizing pressure-treated lumber for its inherent resistance to rot and insect infestation. This ensures longevity and reduces the need for frequent maintenance. The specific dimensions may be adjusted to suit individual preferences, but the following quantities are a reasonable starting point for a standard-sized four-seater table:

Lumber Requirements:
- Four 4x4 posts (approximately 30 inches long), for the legs.
- Two 2x6 boards (approximately 72 inches long), for the table top supports (longitudinal beams).
- Two 2x6 boards (approximately 48 inches long), for the seat supports (transverse beams).
- Four 2x4 boards (approximately 48 inches long), for the seat supports (cross-bracing).
- Four 2x6 boards (approximately 72 inches long), for the table top planks.
- Two 2x6 boards (approximately 48 inches long), for the seat planks.
Note: Always purchase slightly more lumber than calculated to account for potential cutting errors and imperfections. Inspect each piece carefully before commencing construction to identify any significant defects.
Hardware Requirements:
- Exterior-grade wood screws (at least 3 inches long).
- Exterior-grade wood glue.
Choosing high-quality exterior-grade hardware is crucial for resisting weathering and ensuring the table's longevity. Avoid using inferior materials, as they are likely to fail prematurely, compromising the structural integrity of the project.
Tool Selection and Preparation
This project can be completed using a minimal set of tools, making it accessible to a wide range of individuals. The following tools are essential:
Essential Tools:
- Measuring tape
- Pencil
- Hand saw or circular saw (with appropriate safety measures)
- Drill with assorted drill bits (including a pilot hole bit)
- Screwdriver (Phillips head recommended)
- Level
- Clamps (optional, but highly recommended for improved accuracy)
Before commencing construction, ensure all tools are in good working order and sharp. A dull saw blade or drill bit will result in inaccurate cuts and increased effort. Always prioritize safety by wearing appropriate protective equipment, including safety glasses and work gloves.
Construction Stages
The construction process is divided into manageable stages, simplifying the overall project. Each step is described in detail to ensure clarity and accuracy.
Stage 1: Assembling the Leg Assembly
Begin by creating the leg assemblies. Using two 4x4 posts, position them parallel to each other at the desired width of the table. Pre-drill pilot holes to prevent splitting the wood when driving in screws. Securely attach the posts together using 3-inch exterior grade wood screws. Repeat this process to create a second leg assembly. Ensure that all four legs are of identical height using a level.
Stage 2: Attaching the Longitudinal Beams
Position the two 72-inch long 2x6 boards parallel to each other and secure them to the top of the leg assemblies using wood screws. These boards form the longitudinal supports for the tabletop. Pre-drilling is crucial here to avoid splitting the wood. Maintain consistent spacing between the beams for even weight distribution.
Stage 3: Attaching the Seat Supports
Attach the two 48-inch 2x6 boards perpendicular to the longitudinal beams, creating the supports for the seats. These are secured to both the longitudinal beams and the legs using screws. Ensure that the seat supports are level and evenly spaced for a comfortable seating experience.
Stage 4: Adding Cross-Bracing for Stability
Enhance the structural integrity of the table by adding cross-bracing to the seat supports. Attach the 2x4 boards diagonally to the underside of the seat supports, further strengthening the entire structure. This step is crucial for ensuring the long-term stability of the picnic table.
Stage 5: Attaching the Tabletop Planks
Lay the four 72-inch 2x6 boards across the longitudinal beams, forming the tabletop. Secure them using screws, ensuring that the boards are tightly aligned and flush with each other. Use a level to ensure that the tabletop is perfectly horizontal.
Stage 6: Attaching the Seat Planks
Similarly, attach the two 48-inch 2x6 boards to the seat supports, creating the seating area. Secure them using screws, ensuring even spacing and alignment. The seat planks should be comfortable and sturdy.
Finishing Touches and Maintenance
Once construction is complete, consider applying a protective finish to enhance the durability and aesthetics of the picnic table. A high-quality exterior-grade wood sealant or stain will protect the wood from the elements, prolonging its lifespan. Regular maintenance, including occasional cleaning and reapplication of sealant, will further ensure the longevity of your picnic table.
Note: Allow ample drying time for the wood glue and sealant before using the table. Always follow the manufacturer's instructions for the specific products used.
This comprehensive guide provides a detailed roadmap for building a durable four-seater picnic table with minimal tools. By following these steps carefully and using quality materials, you can create a long-lasting and enjoyable addition to your outdoor space. Remember to prioritize safety throughout the construction process and enjoy the rewarding experience of crafting your own piece of outdoor furniture.


0 comments:
Post a Comment